![]()
Introduction:
First of all I would like to point out that RayFX is currently
in a beta-stage. As such it is not yet fully functional, and
as a result one could call this tutorial a "beta-tutorial".
There are a few functions which I don't fully understand myself,
and with some I don't know whether it's a problem with the beta-state
of the plugin, or with my own lack of knowledge. With that in
mind, I would welcome any feedback regarding wrong statements
in this tutorial so that I can rectify the texts in question.
RayFX from Blur is a freeware
plugin (hopefully it stays that way :-)), that extends the raytrace-capabilities
of the standard scanline renderer in MAX 3 with some important
features.
The most important among them, however, are the RayFX-Shadows:
with these You can create weak Raytrace-Shadows, employing so-called
"Area lights". Up to now You've only been able to create
weak shadows through the use of Shadow maps, which unfortunately
presents problems with transparent objects, such as glass.
If You only have limited experience with Raytrace- and Mapped-shadows, You should read the two tutorials "Caustics" (german!) and "Lighting setup in Max" (german!). They will teach You a little about the standard possibilities in MAX when it comes to lighting and raytracing. You will find it easier to solve any problems that might arise with using RayFX if You do.
Next,
a little installation help:
Download the following ZIP-files from BlurBeta:
RayFX.zip
(contains RayFx.dlu / RayMtl.dlt / RayTex.dlt)
RayFXShadows.zip (contains RayFxStdShadow.dlo / RayFxAreaShadow.dlo)
BlurLib.zip (contains BlurLib.dlu)
Copy all the files into Your StdPlugins directory, making back-up copes of the original RayFx.dlu / RayMtl.dlt / RayTex.dlt. That way, in case You would not be satisfied with the Blur-Raytrace Tools, You can always go back to the old (standard MAX) RayTrace-plugins.
The BlurLib.dlu is necessary to be able to run any plugins from Blur in the first place.
RayFX
Shadows:
There are two different types of RayFX-Shadows; the Standard-RayFX-Shadows
and the Area-RayFX-Shadows. The Standard-RayFX-Shadows only differ
from the Standard-MAX-Raytrace-Shadows slightly. Even though
the Standard-RayFX-Shadows has a few more options, they are hardly
worth the trouble due to the slower speed when calculated.
|
|
|
|
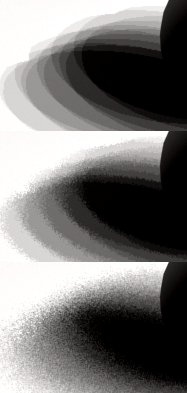
 More interesting
are the RayFX Area Shadows. Although the render times for them also run
high, one gets weak Raytraced shadows - Area-Shadows - in return for its
extra effort. Area-Shadows approximate reality quite closely. The effect
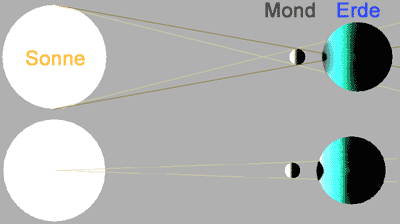
is especially clear when the light source is larger than the object casting
the shadow. It's like a solar eclipse: The sun is the (area)light source,
and the moon casts a shadow onto Earth. With such an event, all the talk
is about the core shadow. As You can see in the image, the core shadow
is only existent in the area in which the moon casts a full shadow onto
Earth. The rest of the area is in a penumbra'd state - the moon casts
a shadow onto the area, but as the entire sun is larger than the moon,
these shadows gradually get blown out by the light of the sun that passes
by the moon.
More interesting
are the RayFX Area Shadows. Although the render times for them also run
high, one gets weak Raytraced shadows - Area-Shadows - in return for its
extra effort. Area-Shadows approximate reality quite closely. The effect
is especially clear when the light source is larger than the object casting
the shadow. It's like a solar eclipse: The sun is the (area)light source,
and the moon casts a shadow onto Earth. With such an event, all the talk
is about the core shadow. As You can see in the image, the core shadow
is only existent in the area in which the moon casts a full shadow onto
Earth. The rest of the area is in a penumbra'd state - the moon casts
a shadow onto the area, but as the entire sun is larger than the moon,
these shadows gradually get blown out by the light of the sun that passes
by the moon.
The second image shows the way normal, computer generated, light
sources work. These calculate their shadows as seen from a single
point in space (the center of the sun in this case). That's why
the moon in can't cast any penumbra, and only casts a 100% dark
spot.
Now then, on to the setup possibilities of the RayFX-Area Shadows.
The
Shadow Parameters Rollout:
To be able to use AreaShadows at all, You have to select "RayFXAreaShadows"
in this rollout. Doing so will show a new rollout entitled "RayFX
Area Shadows". This is where all the necessary adjustments
can be made. The remaining parameters, such as Shadow-color and
-density aren't functioning in RayFXShadows yet (!).
The RayFX Area Shadows Rollout:
Basic
Options:
Only let the checkbox "Transparent Objects"
checked if You actually will be rendering transparent objects
(such as glass) in Your scene. Otherwise Your render time will
only be unnecessarily high! The quality of the rendering would
not improve!
Mode: RayFX only supports two types of Area-Lights at the moment; Rectangle Lights and Box Lights. The others, such as Disc, Triangle and Sphere, are not yet supported. In most cases these two available types will suffice however. Simply imagine a glowing rectangle as being a light source (for example, a monitor), or a glowing cube. As light sources these make substitutes for spotlights (rectangle light) or omni lights (box light). Omni (box) lights will, of course, require far more render time.
RayFX Global Parameters: This is where, as with the Standard-MAX shadows, the Raytrace-Parameters can be adjusted. More about this later.
RayFX Include: This is where one can include/exclude objects from casting shadows from the selected RayFX light. Even though illumination is the only choice, the effect only applies to casting shadows. One must also select at least two objects to get any effect: one object that will cast the shadows, and another that will receive them. Only then will the shadows not show up (and won't be calculated - the render time will drop). Even though one can use the in- and exclude options in the General Parameters rollout, one should utilize this new functionality to exclude objects from casting shadows. It's simply faster.
Area
Light Dimensions:
This is where the size of the AreaLights can be adjusted. This
is necessary to create weak raytraced shadows (the light source
must have a set size, to send out rays from more than a single
point in space. Think back to the solar eclipse example!). When
using a Rectangle light, only the Width x Height matters. Using
the Box Light mode adds a depth (Length) parameter. The values
represent the same units in which Your scene is built. Unfortunately
these values are not yet visualized in the viewports, however
this should be implemented in the next version of the RayFX Shadows.
The higher You set these values, the larger the light source
becomes and the greater the penumbra area. The sphere in my example
scene (see further down) has a radius of 20 units, and the arealight
measurements of 100 x 100 units. (If one accepts Blur's explanation,
the arealight is about twice as big as the sphere.)
Area
Light Parameters:
The most important parameters, that are related to the raytraced
penumbra, can be adjusted here.
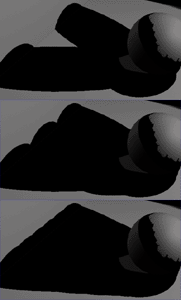
 Detect Supersampling: As far as I could tell from
the documentation by Blur, this option prevents double antialiasing.
Detect Supersampling: As far as I could tell from
the documentation by Blur, this option prevents double antialiasing.
When the shadow falls onto an object using Supersampling, the
shadow will be rendered even smoother (more blurred). The two
images show this effect even better (I have upped the contrast
parameter a lot to further emphasize the problem - hence the
black and white impression.)
A sphere casts a(n) (Area)Shadow onto a plane, functioning as a floor. In the upper image the Supersampling was not calculated. One can clearly see the shadow artifacts in the left side of the image.
The lower image shows the cast shadow (no shadow parameters were altered) onto a plane that does have supersampling switched on. The artifacts are clearly less apparent.
As one can see it is true that the shadows get rendered "twice as smooth". What, exactly, the "Detect Supersampling" option has to do with this is a puzzle to me. Whether it is on or off, on a Supersampled object the shadow will always get rendered twice as smooth. The option simply doesn't show any effect. I don't know whether that's a problem with the beta-version state of the plugin or not. It just doesn't make any sense to me...
Detect Recursion: I'm afraid I'll have to pass on this one as well. According to the documentation, this should also prevent any double and triple anti-aliasing (for example, penumbra being reflected in a reflecting surface). But as the anti-aliasing in reflections and refractions don't work without problems yet, this option is - in my opinion - also close to useless for now.
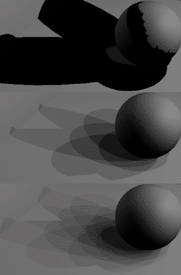
 Pass 1 Quality: Areashadows,
in the end, are just faked. Instead of using only one lightsource (which
only casts one shadow), multiple lightsources will be used, which will
each send out weaker light, but all over a same area (being sent from
the dimensions of Your arealight settings). Simply put: Pass 1 Quality
dictates how many of these light sources will exist. At 1 there's only
a few, but at higher settings the more light sources will be spread out
over the AreaLight surface, and the more accurate the shadows will be.
Have a look at the two images to the left. I have decreased all other
values to a minimum, to show the effect of this parameter better. The
upper image shows Pass 1 Quality at a lowly value of 1. The middle images
shows a value of 3 and the lower images shows a value of 6.
Pass 1 Quality: Areashadows,
in the end, are just faked. Instead of using only one lightsource (which
only casts one shadow), multiple lightsources will be used, which will
each send out weaker light, but all over a same area (being sent from
the dimensions of Your arealight settings). Simply put: Pass 1 Quality
dictates how many of these light sources will exist. At 1 there's only
a few, but at higher settings the more light sources will be spread out
over the AreaLight surface, and the more accurate the shadows will be.
Have a look at the two images to the left. I have decreased all other
values to a minimum, to show the effect of this parameter better. The
upper image shows Pass 1 Quality at a lowly value of 1. The middle images
shows a value of 3 and the lower images shows a value of 6.
In the upper image there are clearly three Shadows to be seen, directly below the sphere and two to the left and up. In the middle image there are already more calculated shadows to be seen, and in the last image even more. It should be clear that this improves the quality of the Area-Shadows.
According to the Blur documentation, one should increase this value when there are artifacts in the penumbrae, or when very small objects aren't casing any shadows at all.
 Pass 2 Quality: While
Pass 1 Quality controls the primary distribution of the shadows, Pass
2 Quality determines the amount of "sub-"shadows in the penumbrae.
This value should always be higher than the Pass 1 Quality value. Take
a look at the images to the left. Pass 1 Quality is set to a value of
1 in these images.
Pass 2 Quality: While
Pass 1 Quality controls the primary distribution of the shadows, Pass
2 Quality determines the amount of "sub-"shadows in the penumbrae.
This value should always be higher than the Pass 1 Quality value. Take
a look at the images to the left. Pass 1 Quality is set to a value of
1 in these images.
In the
upper image You can see again the effect of a Pass 2 Quality
at 1, as with the previous images. Only the base shadows are
visible.
In the middle image one can see how the "sub-"shadows, as I call them, are generated. Pass 2 Quality has been set to a value of 2 in this image. It looks like the Pass 1-shadows are getting split up in two (or three?) sub-shadows, that accumulate their shadow density values together.
In the last image Pass 2 Quality was set to a value of 3. Even more "sub-"shadows are being generated and the the quality slowly improves.
According
to the documentation, one should increase this value to prevent
blotches or noise in the penumbrae. Important to remember is
that Pass 1 Quality is multiplied by the Pass 2 Quality, and
that Pass 2 Quality multiplied by its own value over that. A
simple example (not exactly correct, but it's close enough to
what is actually going on): If You set Pass 1 to one, and Pass
2 to one, only one penumbra will be calculated.
If Pass 2 Quality were to be increased to 2, You would already
have four penumbrae (1x2x2). Increase it to three, and You will
get 9 penumbrae (1x3x3).
Were You
to increase the Pass 1 Quality to 2 now as well, You would quickly
get 18 penumbrae (2x3x3)
I know, these examples aren't exactly correct (it's more thoroughly
explained in the Blur documentation), but it's about right. So
don't increase these values too much, and if You do, then don't
wonder about the unfathomable render times!
 Blur and Jitter-Amount:
Now You've got more or less "sub-"shadows, but they are still
fairly hard-edged to each other. This is where parameters such as Blur
and Jitter-Amount come into view.
Blur and Jitter-Amount:
Now You've got more or less "sub-"shadows, but they are still
fairly hard-edged to each other. This is where parameters such as Blur
and Jitter-Amount come into view.
Blur seems to shift the individual penumbrae, and isn't a real blurring effect - as the name tends to lead You believe.
Through
the shifting of the individual penumbrae, the edges of the penumbrae
tend to get a little softer, like the image to the left shows.
(I have lowered the dimensions of the Arealight to 20x20, to
create a sharper shadow effect). The upper image was rendered
with a Blur value off 0, the lower image with a value of 50.
It's clear to see that in the lower image the penumbrae lay further
apart than in the upper image.
I can't really recommend any particular value for this parameter,
but I do believe 50 is too much (only useful for exaggerated
examples, such as these). Important to remember is, the higher
the Blur value, the higher one should set the Jitter Amount value
as well.
The artifacts that appear on the sphere and the floor object are direct results of increasing the Blur value. The higher the Blur value, the more probable the effect that polygons start casting shadows onto themselves. We will address this problem later.
 The Jitter Amount value,
is a banding filter, which applies a noise effect to the individual penumbrae,
to further remove the hard edges, blending the shadows together better
and make the edges less detectable. Values between 0.25 and 1.0 are recommended
for this parameter. The higher the Blur value, the stronger the Jitter-Amount
value should be set. With high Blur values, it should even be set above
1.
The Jitter Amount value,
is a banding filter, which applies a noise effect to the individual penumbrae,
to further remove the hard edges, blending the shadows together better
and make the edges less detectable. Values between 0.25 and 1.0 are recommended
for this parameter. The higher the Blur value, the stronger the Jitter-Amount
value should be set. With high Blur values, it should even be set above
1.
In the images to the left I have used the following settings for Jitter-Amount and Blur: The Blur value, as with the previous examples, is set to a value of 50 - quite high..
In the first image the Jitter-Amount is still set to 0, and the image looks the same as in the previous example images. I have only increased the contrast in Photoshop, to emphasize the effect of the Jitter-Amount parameter.
In the second image the Jitter-Amount value is at 0.8. The blending area between the individual "sub-"shadows is made less clear due to the noise effects from the Jitter-Amount parameter.
In the last image the Jitter-Amount value is set at 3.0. Due to the high Blur value of 50 it was necessary to cross the recommended maximum of 1.0.
To get an even softer result now one would have to increase the Pass 2 Quality to decrease the strong noise effect. I have done so and ended up at a value of 8. On top of that I have increased the Pass 1 Quality to a value of 3 to get an accurate depiction of the shadow effect (as You can see in the next three pictures, it's not yet perfect. The Pass 1 and Pass 2 Quality values are still too low).
Now on to the last
images and with them the "Ray Bias" parameter. Ray Bias
is comparable to the map shifting in shadow mapped shadows.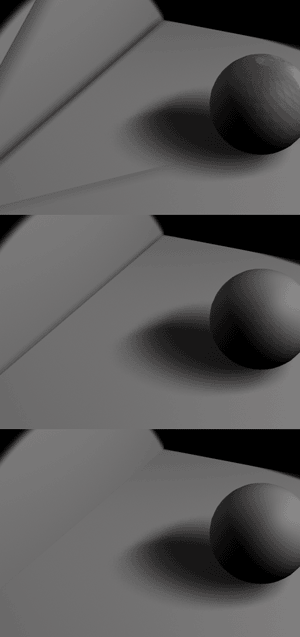 The ugly artifacts
that can be seen in the left-upper area of the top image should be familiar
from shadow maps as well. They appear mostly on spheres and corners of
rooms (90 degree corners)
The ugly artifacts
that can be seen in the left-upper area of the top image should be familiar
from shadow maps as well. They appear mostly on spheres and corners of
rooms (90 degree corners)
To prevent these, one has to increase the Ray Bias value. In the upper image, it is still set to zero.
In the second image I have increased its value to 4, the artifacts on the floor and on the sphere are gone. Only in the edges and corners of the room there's still a dark self-shadowing artifact to be seen.
In the last image I have also eliminated this shadow by increasing the Ray Bias value to 10.
It's a question of taste, but I find self-shadow effects in the corners and edges of rooms (such as in the middle image) quite nice. It gives the image the usually absent contrast, and simulates dirt in the corners and edges. However, one shouldn't over-do it. If You look carefully, the bottom image also still shows a faint line. A little more pronounced (Ray Bias value a little further down again) and it would be perfect.
Last to cover is the Coplanar Face Culling : According to the documentation this value should prevent coplanar faces from casting shadows onto each other. This, for example, is the case with a sphere. The Threshold value indicates the angle at which to accept faces as being coplanar.
Unfortunately I couldn't detect any noticeable effect from this parameter. So just leave this parameter be and spend Your time playing around with the Ray Bias value, when You've got self-shadowing problems going on.
 Just one more small
problem which Blur is still working on: By replacing the Standard MAX
Raytrace Plugins with the Blur Plugins, something happened in Your Raytracer.
Most apparent (to non-English version users) is the language conversion.
All Your raytracer-related issues (global raytracing parameters, raytrace
material, etc.) are now in English.
Just one more small
problem which Blur is still working on: By replacing the Standard MAX
Raytrace Plugins with the Blur Plugins, something happened in Your Raytracer.
Most apparent (to non-English version users) is the language conversion.
All Your raytracer-related issues (global raytracing parameters, raytrace
material, etc.) are now in English.
This, however, is not the problem. Perhaps the following problem
has been more apparent to You. As soon as You use raytraced objects
in Your scene, and activate anti-aliasing in the Raytrace Options,
Your objects will show strange patterns of their wireframe nature.
Blur has promised a fix for this problem in the next version.
At the moment, however, there are just three workarounds for
this problem:
a) One doesn't use anti-aliasing for raytraced objects. Isn't exactly a welcome work-around. Pixelated reflections and refractions will show up.
b) You
activate the Manual Acceleration under the Global Raytrace Settings,
and only use the Single Pipe mode. Deactivate Bounds Checking
when you do!
The disadvantage: You might as well throw the RayFX shadows
away. Your objects will not be illuminated anymore (completely
black) or other strange things happen. You would have to go back
to the Standard Raytraced Shadows, or (even worse) use shadow
maps again.
The advantage: You can now blur/defocus Your raytraced
effects again. This is only possible if Your reflections or refractions
are actually being anti-aliased.
c) You
don't activate anti-aliasing, but the Supersampling option. It
also works on reflections and refractions. You would have to
rely completely on the super-sampling instead of the technically
superior anti-aliasing. Supersampling won't disturb the RayFX
Shadows.
Disadvantage: You have to, once again, give up the blur/defocus
effects. Which isn't too bad actually, most people don't even
know that those options exist ;-).
Who still doesn't have enough power, will have to wait until August. Then Blur may release a new version of their RayFX plugins. With that release things such as caustics, global illumination, radiosity and so on will be possible. You can already take a sneak peek at what's coming in the Blur Gallery. Let's be surprised!
Everything will be alright, and images like the one below will then no longer be a problem (option c!). Even if it took 56 minutes on a Dual 600 (512 MB) machine...